Ryan Drum
Island Herbs
P O Box 25, Waldron, WA 98297-0025
About Ryan | Articles | Contact Ryan
Wildcrafting Medicinal PlANTS
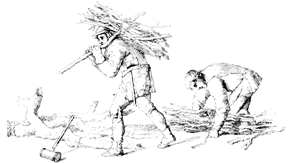
This is a general discussion with specific examples of wild medicinal plant harvesting, drawing heavily on the author's decades of professional wildcrafting. "Wildcrafting" here means the harvest of any plant parts from non-cultivated medicinal plants, plants which have essentially planted themselves in any location. Therefore, "wildcrafting" per se does not imply wilderness harvesting. For me it means harvesting only with my hands and hand tools.
Late 1990's Media Hostility Towards Wildcrafting
Aggressive and sometimes larcenous thorough harvesting of high-price, high-demand, high-profile wild medicinal plants, in particular ginseng roots, goldenseal roots, Echinacea roots, black cohosh roots and saw palmetto berries, has resulted in negative media attention for wildcrafting and wildcrafters (SEE: The Ethics of Wildcrafting, L Thomton, The Herb Quarterly 79:41-46, Fall I998). Much of this media exposure has been prompted by United Plant Savers, a well-intentioned non-profit organization dedicated to protecting wild medicinal plants and their respective habitats (United Plant Savers Newsletter 2: #1-Winter I999; UpS POB 98, E. Barre, VT 05649). "So-called "overharvesting" is 99% an economic phenomenon: usually relatively poor harvesters accessing a "free" resource to supply demand created by successful marketing. Price drives decisions." Most wildcrafters harvest wild herbs because they need the money, not because sick people need the herbs. Most personal herb consumption is a waste of herbs at about the 80% level. What is usually needed is personal lifestyle change. Wildcrafters are relatively innocent, supplying demand created by those often more economically advantaged. Harvesting, legal and otherwise, will continue as long as the market supports it. Better education of herb consumers would probably be a better remedy than more onerous laws and rules for punishing wildcrafters. As long as we have private land some medicinal plant wildcrafting can be expected.
This paper is dedicated to optimal medicinal plant wildcrafting for optimal patient outcome through using the best possible herbs and herbal medicines ...where appropriate.
Tools
For personal harvesting, a strong healthy body with strong teeth and nails can do most harvesting. The simplest tool is a digging stick which can be improved by slowly charring the digging end to harden the wood and produce creosote to retard decay. Length and diameter will be locally and individually sized.
 A commercial harvest is basically piece work: more pieces harvested in the
same or less time increases the money earned per unit. Any tool or body process
improving efficiency without reducing product quality is desireable. Tools
which break or fail easily are to be avoided. Price does not always determine
tool quality. It is assumed here that all quality wildcrafting is done with
hands and hand tools. I believe that the herb quality and its healing efficacy
are severely negatively impacted by machine harvest. I believe that the wildcrafter's
mindset, clarity of healing intent, and process rigor effect the eventual
herbal healing outcome in human health. Herbal healing is more than a few
known dominant physiologically active molecular species and is best served
by continuous conscious healing intent from harvest to individual use.
A commercial harvest is basically piece work: more pieces harvested in the
same or less time increases the money earned per unit. Any tool or body process
improving efficiency without reducing product quality is desireable. Tools
which break or fail easily are to be avoided. Price does not always determine
tool quality. It is assumed here that all quality wildcrafting is done with
hands and hand tools. I believe that the herb quality and its healing efficacy
are severely negatively impacted by machine harvest. I believe that the wildcrafter's
mindset, clarity of healing intent, and process rigor effect the eventual
herbal healing outcome in human health. Herbal healing is more than a few
known dominant physiologically active molecular species and is best served
by continuous conscious healing intent from harvest to individual use.
Protect your hands with well-fitting leather gloves against spines, sharp edges, and venom. Cotton gloves rot; plastic gloves are often clumsy, sweaty, or dermally irritating.
For cutting, a good pair of comfortable anvil pruners is the first tool. Wallace's cotton pruners are the most durable and ergonomic in my experience; Corona and Snap-Cut are okay at first but their blades dull easily and their stripblade return springs fail early. Fiskars are pretty but not durable in spite of attractive designs; cheaper plastic pruners fail rapidly, external spreader springs pop out and are early lost. Bypass pruners do just that and are not human body energy efficient for hundreds or thousands of daily cuts. Avoid anvil pruners with aluminum anvils: the aluminum is cut off in small bits and mixes with the product. Buy brightly-colored (red, orange, blue) tools or paint them; dull, natural-colored tools, especially hand pruners, blend too well with soil and duff and are easily lost. Clean and sharpen cutting edges regularly; use a belt holster to carry or stow a hand pruner.
For cutting woody plants, shrubs, and branches, wooden-handled two-handed bypass "loppers" are best when the cutting edge is sharp and correctly aligned. Cheap tubular steel loppers often have poor steel blades, smush the material being cut, and collapse when asked to cut resistant wood. Wooden-handled loppers are heavy and wearisome for protracted use or carrying far. A better approach is to have a strong sharp anvil pruner and a 12" or 15" high quality bow saw. Bow saws come in two basic profiles: angled and pointy, which allows access to tight spots; or, highly arched for cutting thicker material. Bow saws should be tested before going harvesting; cheap dull blades on cheap saws can be replaced by sharp Sandvik or Disston blades. Always take a spare blade. A 12" or 21" Sandvik bow saw is the best. Clean and dry bow saw blades after each harvest use and store dry with the teeth covered. The sharp edges rust to dullness quickly.
For distal flowers and fruits beyond arm's length, long-handled, single-piece pistol-grip pruners are best. Two-piece rope-pull extension pruners are much more unwieldy and heavier than the 4-6' long-handled pruners.
For digging roots I use a very heavy-duty full-strapped digging fork with 5/8" chisel tip tines which can be used for prying as well as digging. For shallow digging in soft ground I use a plastic-handled Chadwick digging fork or a small one-handed grub hoe.
Harvest Containers
The most product-friendly containers for medicinal plants are sturdy baskets. Next are wide, shallow, non-pesticided cardboard boxes, especially good for leaves and flowers, but most cardboard boxes deteriorate in moist conditions. Plastic buckets are durable and washable, have stiff non-crushable sides, stack nicely and have great handles. Unfortunately their impermeable sides and bottoms promote suffocation and exothermic damage to live plant materials, if metabolic heat is allowed to build which initiates plant death and decay. For most wet cool harvests, 5-gallon plastic buckets work well.
Garbage bags are for garbage. DO NOT USE TRASH OR GARBAGE BAGS TO TRANSPORT OR STORE PLANT MATERIALS INTENDED FOR FOOD OR MEDICINAL USE. Most of these bags are sold with explicit label warnings, "not intended for food use".
If bags must be used, washed polypropylene woven mesh feed bags are the best, durable, lightweight, and washable.
BEFORE HARVEST, PRECISE IDENTIFICATION OF THE PLANT(S) to be harvested is essential as is explicit permission to harvest. Try to have a contract or certain sales for all commercial harvests (herb harvesting with the intent to sell rather than use personally).
Clothing
In deference to natural colors, I urge wiidcrafters to dress in the dominant colors of the immediate harvest environment. This is both to reduce invasiveness and to alarm birds and mammals less. I try to wear greens, browns, and grays and avoid white and bright colors. I prefer gray or brown leather shirts or jackets to protect against sharp spines and biting insects. In the rain I wear gray or brown raingear. During hunting seasons I wear a bright orange raincoat. I recommend wearing no jewelry and having long hair contained.
Records
I urge all who harvest to keep exact, precise records of each harvest: date, time, place, weather (including temperature), species name. Weigh each fresh herb batch harvested and record. If the herbs in a particular harvest are dried, record the dried weight and use the wet and dry weights of a particular harvest to ascertain the wet to dry conversion. This can help reduce unnecessary harvest anxiety about how much wet herb to harvest for a certain amount of dried herb product.
Drying Conditions
Drying conditions can be critical to consequential herb quality. I do not dry herbs outside. Outside nocturnal rehydration of drying herbs can cause significant deterioration of medicinal herb quality. I recommend drying herbs on screened racks, hung from wire racks, or hung in bunches or bundles from nails or hooks. Warm (60-90oF) air is kept moving over and through the herbs.
Wild Crafting Specific Medicinal Herbs
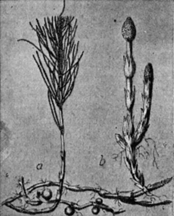
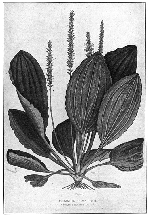
NETTLES - Urtica dioica and related species
NETTLE LEAVES
Tools: Anvil pruner, carrying boxes, buckets or bags
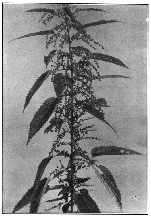 Nettle
leaves, young and mature, can be harvested for herbal medicine throughout
the year whenever healthy and fully-functioning, dependent on climate and
geography. Young nettle shoots and leaves, but not mature leaves, are recommended
for eating. There seem to be no definitive studies indicating more or less
nettle leaf therapeutic efficacy dependent on leaf age or harvest time of
year. Some of my best clinical results come from mature nettle leaves harvested
in July and August from ripe-seeded stalks.
Nettle
leaves, young and mature, can be harvested for herbal medicine throughout
the year whenever healthy and fully-functioning, dependent on climate and
geography. Young nettle shoots and leaves, but not mature leaves, are recommended
for eating. There seem to be no definitive studies indicating more or less
nettle leaf therapeutic efficacy dependent on leaf age or harvest time of
year. Some of my best clinical results come from mature nettle leaves harvested
in July and August from ripe-seeded stalks.
I usually harvest nettle leaves in April, May, and June, before the plants are fully grown or have set seeds. I prefer to harvest them on cool, cloudy (not rainy) days to minimize heat damage.
Nettle leaves can be harvested in two basic ways: removal of individual leaves or cutting the entire emergent stalk, and stripping off the leaves when dried. For small, highest quality harvests, individual leaf harvest is recommended. Individually harvested leaves are cut or plucked and loosely collected into cardboard boxes, sturdy baskets, or plastic buckets. Nettle leaves are best harvested on dark cool days with no rain or sun. They should not be stuffed into bags, but spread out to dry within an hour of harvest. The higher the ambient temperature, the sooner the leaves should be put onto the drying racks. Wooden-framed 3x5' racks with 1/2" mesh galvanized wire with clean used linen supply discard sheets, laid over the metal wires work well. The 50% cotton, 50% polyester sheets prevent herb/zinc contact, do not rot, and are cellulase resistant; cellulases leaking from cut plant parts can weaken and tatter 100% cotton sheets. I dry all of my herbs inside with wood heat and moving air. Nettle leaves have a high moisture content, often over 90% and dry best with dry warm air at 70-90 F. Drying time is 48-72 hrs; leaves on racks are twizzled and stirred at least once every 12 hrs. Dried leaves are stored in airtight, opaque square plastic buckets or any airtight suitable container that will keep out moisture, light and insects, and, not outgas poisonous volatiles or scented volatiles for the the nettle leaves to absorb.
Leafed nettle stems can be cut below the lowest pair of healthy leaves and dried hanging upside down. For large harvest I usually prefer this since the hanging bunches do not require the twizzling and stirring that the rack-drying leaves do.The usual procedure is to wear nettle sting-proof clothing and gloves. (In the old days I harvested nettle leaves without protective clothing for both the alleged therapeutic benefits and as a way of honoring the nettles by accepting their gift of venom. Often I would be numb to my elbows for 12 hours or more, that tended to make other critical manual functions very difficult. I no longer harvest nettle leaves without protective clothing, preferring to take the venom from deliberate topical whipping with mature nettle stalks.)
Each individual leafed stalk is cut using an anvil pruner. In dense stands, 15-20 stalks can be serially grasped and cut while the previously cut stalks remain firmly held in the chelate hand. When the chelate hand can hold no more, the harvested stalks are very carefully laid onto large mesh feed bags transversely (to the longitudinal axis), in a cool shady place until gathered together and tied into a 15-30# transport bundle just prior to transporting to the drying facility. The intent is to minimize impact trauma and transport bruising to the bundled stalks. I place them butts together on the bundling bags as I harvest the stalks, to reduce tangle when hanging the stalks and to produce balanced bundles for carrying.
I prefer to harvest stalked nettles on cool sunless days to reduce harvest trauma to the plants and to personally avoid getting too hot from protective clothing. Rain-harvested nettles will usually not mold or discolor if hung to dry in small bunches in spaces well-ventilated with warm dry air.
Once the nettles are at the drying place, the tied bundles are weighed for conversion data, and untied to cool the stalks. In the old days I tied the leafed nettle stalks with pesticide-free cotton string in 1" diameter bundles, butts together, and hung individual bundles at circa 6" spacing , butts up, in rows on 20d box brite nails, the rows about 8" apart. Now I no longer tie the bunches to reduce time and string costs. I simply break-bend the 1-1/2 to 2" diameter bunches, flatten them and use the bent butts as hangers directly onto the nails. These bunched stalks take 8-12 days to dry at 70-90oF. When processing dried nettles regular use of a tight-fitting dust mask during all procedures is strongly advised. The sharp silica bits loosened from the nettle surfaces act as broken glass and can permanently damage the respiratory tract; the condition is called "silicosis". Wear protective clothing as well to prevent epidermal irritation. After the leaves and stalks are completely dried, one to several stalks are removed by the chelate hand and the leaves stripped with the other hand onto receiving cloth sheets laid out flat. The top 5-6" of each stem is also snapped off and added to the mass of leaves. When a huge pile of stripped leaves nearly covers the receiving sheet, the sheet comers are carefully gathered towards the center to make one big covered pile. This gathered pile is then carefully smashed flat so that few or no leaf bits are dislodged from the gathered sheet. The leaf pile can be further milled a bit prior to storing in airtight opaque plastic buckets. After each successive stalk stripping, the stalks are carefully placed to one side and eventually cut into 2-3" pieces for storage. These stalk pieces can be used for many of the medicinal applications of nettle leaves; they make a refreshing tea and seem to enhance percutaneous perfusion from herbal soaks., especially to relieve symptoms of chronic joint and muscle pain. Some herbalists prefer the stalks kept with the leaves; inquire.
NETTLE ROOTS
Tools: anvil pruner, digging fork, single-handed grub hoe with 3-4 scratching tines, boxes, bags, buckets, or baskets for transporting.
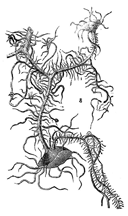
Nettle roots can be harvested for food and medicine anytime the ground is diggable. I prefer digging nettle roots on cool cloudy days after the first killing frost in Autumn and before mid-April in the Spring for both peak therapeutic efficacy and to avoid unpleasant encounters with occupied underground hornet nests. I choose dense, well-established nettle patches usually in aldergroves with rich soil. Nettles are fond of lots of nitrogen and get that from the alders who are nitrogen fixers via the actinomycetes living symbiotically with their roots. I wear protective clothing. I try to harvest mostly the 3-6 yr bright yellow nettle roots, avoiding or minimizing the thin watery colonizing terminal rhizomes which bruise easily and are about 95% water (yummy to eat by juicing or chewing while harvesting).
Roots to be harvested are located by finding lots of last year's stems or young emergent shoots and using the digging fork to carefully lift large flat areas of soil. Often interwoven tangles of many bright yellow roots appear; these are best followed singly with gloved hands and further exposed using the grub hoe. The objective is to harvest the roots with as little tearing or bruising as possible. I tend to cut off 20-24 inch sections as they become exposed by digging. Harvested root tangles can weigh up to ten # and have root branches up to 20' long. I avoid pulling or ripping out the roots; their epidermal layer is very thin and rather delicate. The high nutrient content of nettle roots makes them especially susceptible to rot and decay after bruising. The harvested root sections are laid very carefully transversely onto flat mesh feed bags or into large flat cardboard boxes in the shade, until transported to the washing area. Do not stuff them into bags. The roots should be kept moist to prevent drying internally and drying of soil particles onto the root surfaces. Old and dead brown, gray, and rotten-cored roots should be reburied.
After digging, the roots are placed on a washing table or screen and carefully individually pressure-washed with non-chlorinated water; a wetted sheet is placed over the washed roots to prevent premature drying while the individual root pieces are cut to 12-14" for fresh shipment, or 4-8" for drying. All dead root bits and old stems are carefully removed with an anvil pruner. Nettle roots for drying are laid out 1" thick on drying racks and dried at 60-80oF for 6-12 days. Store in airtight opaque buckets.
Nettle patches usually completely regrow within two years after up to 60% harvest of aerial parts or roots.
NETTLE SEEDS (FRUITS)
Tools: leather gloves, anvil pruner, receiving bucket or bag
Nettle seeds are best harvested while the seed husks remain green and fleshy on each of the individual seeds. The firm seeds within have a light brownish seed coat. I believe from personal experience that the ripe seed husks have medicinal and psychotropic properties not present in just the mature seeds. So, I harvest the ripe nettle fruits, each with a seed within. Harvest occurs anytime the fruits are ripe, from May to November and, before the husks have dried and become brown or gray. Post-ripe seeds have considerable nutritional and medicinal value, though not as much as ripe fruits with seeds.
Hand harvesting of nettle seeds is slow and exacting; nettle-resistant clothing is recommended. For small amounts (less than two pounds), terminal clusters of ripe fruits are stripped off with the free hand, while the chelate hand holds the stalk being stripped and a harvested seed receptacle hangs from the chelate arm. I usually wear a sting-proof glove on the left chelate hand and strip the seed clusters with the bare right hand; the bare hand being faster, defter and may enjoy the transdermal medication. For larger harvests, armloads of ripe fruit stalks are cut 6-10" below the lowest ripe fruit clusters and carefully placed on sheets, bags, or tarps. After 100-200 tops are harvested, I like to sit down in the shade alone or with my helpers and carefully strip off only the ripe fruit dusters into 5-gallon buckets. The stripped fruits are kept in the shade; after stripping, scattered fruits and fruit clusters on the ground cover are carefully gathered and added to the bucket of ripe fruits. The ground cover conserves a lot of nettle fruits which might have otherwise been lost.The maximum harvest rate per person per hour is about 1 pound fresh. After harvest the fruits are usually dried as thinly spread (an inch or less) even layers on shallow drying racks and dried at 70-90oF for 72-96 hours. Shortly after spreading the fruits to dry, all leaves and foreign plant debris should be carefully removed. The drying fruits are twizzled and stirred at least once every 12 hrs. Dried fruits may be screened for further cleaning, (I do not recommend winnowing due to the high value of the fruits), and then placed in opaque airtight buckets for storage.
For many years I did rough and rapid harvest of nettle fruits and seeds, wearing spine-resistant gloves and spine-protective clothing. Nettle stems with terminal ripe fruit clusters were rapidly stripped, leaves and fruits together, 10-20 stems per minute into large tight-weave poly mesh feed bags. Several bags would be stuffed full and transported to the drying room and spread 20# per 3x5' drying rack and dried at 70-90oF for 4-5 days. The masses were twizzled and stirred at least once every 12 hr. Rough twizzling and stirring tended to shatter the drying and dried fruit clusters onto the sheet beneath the drying plant materials. Most of the fruits would be loosened. The leaf and stem material was carefully picked up by hand off the catch sheets and any loose fruits shaken from each handful. The fruits were further coarse and fine screened. The pounds of dried fruit yields per day for this method were higher than with more precise stripping, but took about the same amount of labor per pound of product as the precision method. The added bonus from the rough and rapid method was many pounds of useful dried mature nettle leaves. Eating fresh nettle fruits while harvesting them can be an unforgettable treat. In most of their range, nettles are abundant, aggressive, delightful, prolific and impudent. They do not like regular mowing or full sunlight. Leave a few and they usually regenerate.
YARROW Achillea spp.
Tools: anvil pruner, cotton string, collection buckets, baskets or bags.
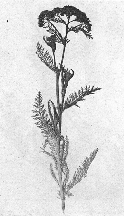 Aerial
parts of yarrow are harvested at least three different ways, each yielding
a significantly different product.
Aerial
parts of yarrow are harvested at least three different ways, each yielding
a significantly different product.
BASAL LEAVES
In the late spring and early summer lush aromatic basal rosette leaves of yarrow are harvested singly and dried by laying in thin layers on flat racks, or the loose leaves are tied, butts together into 1/2-3/4" thick bunches and hung to dry inside at 70-80oF. Lush-leaved crowns may be cut off intact at ground level and hung individually inside upside down to dry; drying time may take up to two weeks. Store in airtight, opaque containers when dry. Basal leaves dried and powdered make an excellent styptic which is mildly antiseptic, analgesic, hemostatic and can be applied directly to open wounds, especially shallow scrapes.
FLOWER TOPS
Yarrow flower tops can be harvested at any stage after the stalked inflorescence has noticeably formed, until the floral petals turn gray, brown, or droop. I prefer a mix of equal amounts of unopened flower tops, yellow-staminate recently opened flower tops, and mature, pollinated flower tops plus some stalk leaves. Flower tops are hand-snapped quickly without pruners when flowers are closed or staminate. After pollination, the entire flowering top becomes woodier and can be grasped with the chelate hand and cut with an anvil pruner in the cutting hand into a basket, bucket or strong paper bag. Flowering tops are best gathered on cloudy cool days or before 9 AM on sunny days. Drying time for flowering tops is 5-10 days at 70-90°F, depending on the ambient humidity and the woodiness of the material being dried.
ENTIRE AERIAL YARROW PLANT
My teacher, Ella Birzneck, a famous Canadian herbal healer, insisted on using the entire aerial plant in most of her yarrow medicine, i.e. all of the basal leaves (discarding dead and damaged leaves) and all of the flowering stalk (leaves, stem and flowers). We cut the stems and leaves by hand into little pieces and dried them on flat racks. She worked healing miracles.
This harvest technique is hard on the plant as Yarrow spreads mostly by vegetative runners. Care should be taken therefore, to not disturb their shallow-rooted crowns. If you do, please kindly replant them. Yarrow reproduces sexually cleistogamously, so harvesting the bold terminal flowering tops will not eliminate successful seed production. If only the initial apical flowering tops are harvested, residual axillary floral buds lower on the flowering stalk will produce more flowers. When I harvest wild plants I leave an offering, usually a small crystal or some seaweed. I try to be ever mindful of exchanging gifts and giving thanks.
YARROW STALKS FOR DIVINATION
Yarrow stalks for divination are best snapped off at the ground at the full moon just after most flowers are pollinated. These flower stalks are hung tied together in bundles of 11,13,or 21, butts up, to dry, after first cutting off the flower tops. Dry inside at 80°F, 6-I4 days. After drying, gently strip leaves from stalks; store stems as fine medicine. These active-constituent-loaded will add clarity when used to consult the oracle (I Ching) due to palmar percutaneous perfusion of bioactive molecules.
HORSETAIL Equisetum spp.
Tools: Anvil pruner, transport bags, buckets; scissors, cotton string.
 Botanically
thrilling, Equisetum species are therapeuticaliy helpful and dangerous for
human health. Allegedly sourced for silica, Equisetum harvest and drying may
produce an end product with little or no available silica for actual human
consumption. The reason is simply that silica once precipitated is reluctant
to return to solution, a fact we cherish in all of our fine glassware and
bottles. If silica were easily dissolved our glassware would tend to disappear
with repeated washings. It usually does not, unless dropped and shattered.
Botanically
thrilling, Equisetum species are therapeuticaliy helpful and dangerous for
human health. Allegedly sourced for silica, Equisetum harvest and drying may
produce an end product with little or no available silica for actual human
consumption. The reason is simply that silica once precipitated is reluctant
to return to solution, a fact we cherish in all of our fine glassware and
bottles. If silica were easily dissolved our glassware would tend to disappear
with repeated washings. It usually does not, unless dropped and shattered.
Horsetail deposits epidermal opaline silica as structural stiffener and to discourage herbivory. To be able to shape and deposit solid silica the plant must move it internally in solution to young and growing cells. Once the aerial plant part is fully formed, its need for silica in solution is very low. Mature, fully grown vegetative stalks have a very low dissolved silica content. For biosourced silica, press out the fresh juice of young live horsetail plants. Preserve by freezing or syruping in full-strength honey.
For other medicinal applications harvest a mix of roughly equal amounts of immature and mature aerial stems by plucking near the ground and carefully laying the stems, butts together, transversely on mesh poly feed bags, 15-25# per bag. For safer transportation, stems can be placed butts down in 5-gallon plastic buckets. I prefer to harvest horsetail before 9 AM on sunny days, or on cloudy days. Horsetail can be harvested in the rain.
For drying small amounts, the stems can be laid on sheets on drying racks 1-2" deep and dried at 70-100oF. If you have the rack area available and warm air circulating continuously, it is easiest to dry horsetail on racks. After the stalks are completely dry they are cut into 1-2" lengths with scissors. Cut and dried horsetail pieces shed a lot of very dangerous sharp silica bits which are extremely hazardous and irritating to the respiratory tract and even the surfaces of the eyes. ALWAYS WEAR A TIGHT-FITTING DUST MASK OVER YOUR FACE WHEN PROCESSING DRIED AERIAL PARTS OF ANY HORSETAIL OR EQUISETUM.
I tie horsetail stems in bundles about 1 1/2" diameter, butts together, with cotton string, as tightly as possible. Often the string breaks, so in the last few years I have changed to using fine nylon string which is actually cheaper in 1000 yard rolls than cotton string. The nylon string can be tied very tightly without much danger of frustrating breakage.The horsetail bunches are tied very tightly because horsetail stalks are over 90% water and shrink at least 50% in diameter as they dry in the tied bundles. Loosely tied bundles tend to drop stalks spontaneously. At 70-100oF these bundled stalks will usually dry in 3-8 days. When the bunches are totally hard-crack dry, remove them from their respective hanging nails, cut off the tied portion of each bundle and discard as the inner bundled stalk butts tend to decay a bit due to poor air flow. The dried stalks are hand cut with scissors into short pieces for storage in airtight, opaque containers.
Clearcutting wild stands of horsetail for 15 years in a row does not noticeably reduce annual yield, vigor, area of growth (it enlarged), or medicinal efficacy. After hundreds of millions of years of success, it is very eradoresistant.
USNEA Old Man's Beard USNEA spp.
Tools: pistol-grip long-handled pruner, anvil pruner, transport bag, bow saw.
 Usnea
is a common and sometimes abundant northern forest lichen. It tends to grow
as hanging aerial tufts and/or long gossamers on the dead lower branches of
live trees. Harvest only vital living specimens during active growth using
whatever tool is convenient. Active growth occurs during long wet seasons,
usually not in dry summer or frozen winter. Rogue out obviously dead, decayed,
or discolored sections and non-Usnea lichens, leaves, and excess bark bits.
Do not remove the little woody attachment bases where the individual Usnea
plant attaches to its host. Check several specimens for the characteristic
white thread which occurs inside every linear Usnea piece. Discard all checked,
cracked Usnea specimens; they are often dead. Dry Usnea piled 2-4" thick
on drying racks with sheets over the metal screen 4-8 days at 70-100oF inside.
After dry, stuff into 4-gallon buckets with airtight lids and store in a cool
dark place.
Usnea
is a common and sometimes abundant northern forest lichen. It tends to grow
as hanging aerial tufts and/or long gossamers on the dead lower branches of
live trees. Harvest only vital living specimens during active growth using
whatever tool is convenient. Active growth occurs during long wet seasons,
usually not in dry summer or frozen winter. Rogue out obviously dead, decayed,
or discolored sections and non-Usnea lichens, leaves, and excess bark bits.
Do not remove the little woody attachment bases where the individual Usnea
plant attaches to its host. Check several specimens for the characteristic
white thread which occurs inside every linear Usnea piece. Discard all checked,
cracked Usnea specimens; they are often dead. Dry Usnea piled 2-4" thick
on drying racks with sheets over the metal screen 4-8 days at 70-100oF inside.
After dry, stuff into 4-gallon buckets with airtight lids and store in a cool
dark place.
Usnea is amongst our best herbal antibiotics against gram positive bacteria, particularly Streptococci and Staphylococci, internally and externally. Prepare by soaking finely cut Usnea pieces in hot olive oil (120-140oF) for a week; store at 90-100oF to further the extraction of usnic acid for up to 4 months. Do not pour off the oil until needed. Apply topically or mixed with salad oils or raw sesame tahini for internal consumption.
In the Pacific Northwest coastal regions, Usnea is abundant, prolific, and a problem in orchards. It seems to grow back quickly and profusely as well as colonizing newly available substrata.
WILD CHERRY BARK PRUNUS Spp.
Tools: bow saw, anvil pruner, linoleum knife, slick, scissors, sheets, transport bucket.
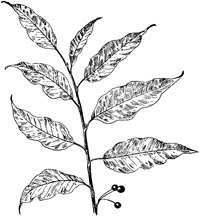 Wild
cherry bark is usually a May-June harvest, often with a very limited time
frame in a particular place in a particular year. The bark is harvested when
it slips or peels easily away from the subtending cherry wood. Harvest times
are tested by using a sharp tool (anvil pruner blade tip or linoleum knife)
to cut a 3 by 3" square through the cherry bark to the wood, removing
the outer corky wrap layer and trying to lift the inner bark off the wood.
I start testing in late April. I harvest 3-10-year-old coppiced sprouts 2-6"
in diameter from tree stumps that were originally harvested 20-25 years previously.
The sprouts are felled using a sharp bow saw.
Wild
cherry bark is usually a May-June harvest, often with a very limited time
frame in a particular place in a particular year. The bark is harvested when
it slips or peels easily away from the subtending cherry wood. Harvest times
are tested by using a sharp tool (anvil pruner blade tip or linoleum knife)
to cut a 3 by 3" square through the cherry bark to the wood, removing
the outer corky wrap layer and trying to lift the inner bark off the wood.
I start testing in late April. I harvest 3-10-year-old coppiced sprouts 2-6"
in diameter from tree stumps that were originally harvested 20-25 years previously.
The sprouts are felled using a sharp bow saw.
DO NOT USE A CHAIN SAW TO CUT TREES INTENDED FOR MEDICINE. The chain bar oil and exhaust will contaminate the product.
Before cutting each sprout into 8-16' slipping lengths, I cut a longitudinal groove with a sharp linoleum knife from the cut butt all the way up to smallwood, circa 1" diameter. Next I carefully peel off the outer bark corky layer and discard, (the children like to draw and write on it). Then, using a slick or spud (a 3-6' long-handled chisel with a 2-4" wide cutting edge) I quickly and carefully peel away the desired inner bark in long strips. These strips are then quickly hand cut into 3-6" pieces onto a clean cloth sheet in the shade and then transferred to drying racks to dry at 70-90oF for 4-8 days. The drying bark pieces are stirred a bit every 12 hours or so; they do not require twizzling. I try to choose a gray cool cloudy day for bark harvests to retard unwanted drying of bark and heat-worsened bruising. Store dried cherry bark in airtight opaque containers.
WILLOW BARK SALIX spp.
Tools: bow saw, anvil pruner, peeling knife, scissors, bags, sheets, buckets.
 Willow
bark is harvested April-July when the bark slips easily off the inner wood.
This occurs because the bark must first grow to accommodate the impending
centrifugal diameter growth of the tree, or it would burst, which in fact
does occur to trees sometimes. Young willow sprouts 2-8 years old with only
a very thin layer of corky outer bark and nice green photosynthetic cells
close to the surface, 3/4-3" in diameter are cut with a hand saw from
a coppiced stump, pollarded trunk or fallen tree, trimmed of smallwood and
quickly stripped with the aid of a smail stripping knife. The stripped bark
is quickly and lightly stuffed into clean dry 80# mesh feed bags. DO
NOT STRIP BARK FROM WOOD STiLL ATTACHED TO THE TREE; CUT OFF ALL WOOD TO BE
STRIPPED BEFORE STRIPPING.
Willow
bark is harvested April-July when the bark slips easily off the inner wood.
This occurs because the bark must first grow to accommodate the impending
centrifugal diameter growth of the tree, or it would burst, which in fact
does occur to trees sometimes. Young willow sprouts 2-8 years old with only
a very thin layer of corky outer bark and nice green photosynthetic cells
close to the surface, 3/4-3" in diameter are cut with a hand saw from
a coppiced stump, pollarded trunk or fallen tree, trimmed of smallwood and
quickly stripped with the aid of a smail stripping knife. The stripped bark
is quickly and lightly stuffed into clean dry 80# mesh feed bags. DO
NOT STRIP BARK FROM WOOD STiLL ATTACHED TO THE TREE; CUT OFF ALL WOOD TO BE
STRIPPED BEFORE STRIPPING.
Harvest is best on a cool gray cloudy day to reduce drying of bark to wood or in bags while transporting to cutting and drying area. Willow bark peeled strips are best kept in widths of 1 inch or less as wider strips tend to curl into cylinders. The inner surfaces of curled strips may mold before totally drying. The strips are hand cut with scissors into 2-4" pieces, dried loosely on racks at 60-70oF and stored in airtight opaque containers when dry. There is some evidence that higher drying temperatures degrade some active constituents in willow bark.
DANDELION Taraxacum officinalis
Tools: STRONG DIGGING FORK, ground knife, anvil pruners, pressure water,
Whole Dandelions, Roots and Tops Together
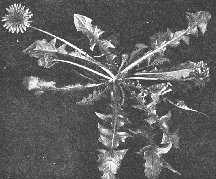 Whole
dandelions are best dug when the plants are obviously lush, green and actively
growing, as opposed to late fall, winter or early spring's straggly appearance,
especially of the greens. I prefer to dig them before the summer solstice
in the spring and after the autumn equinox usually through October. I use
a full-strapped very heavy duty digging fork which can be used as a prying
bar beyond simple digging, in tough turf or unruly rocky ground. Tediously
I cut a squarish 12" deep plug and lift it carefully out and break the
soil away from the roots with utmost care to minimize tearing or breaking
the plump brittle roots. The broken roots are a mixed blessing; each little
piece may grow an entire new dandelion plant; each broken end on the harvested
portion will exude some of the precious hepatophilic latex. I try to dig dandelions
on cool doudy days to reduce heat and drying damage. If not entirely possible,
I take an extra sheet or two along for impromptu shade/cover for plants already
harvested. So far, whole dandelion plant harvest has been exclusively for
the fresh plant extract medicinal trade. Since they are to be shipped fresh
live, great care is taken to ensure that freshness. Not only do I dig on cool
cloudy days, but also early in the morning to reduce plant stress. The plants
are pressure washed with pure, unchlorinated water in the shade and allowed
to drain before packing and shipping.
Whole
dandelions are best dug when the plants are obviously lush, green and actively
growing, as opposed to late fall, winter or early spring's straggly appearance,
especially of the greens. I prefer to dig them before the summer solstice
in the spring and after the autumn equinox usually through October. I use
a full-strapped very heavy duty digging fork which can be used as a prying
bar beyond simple digging, in tough turf or unruly rocky ground. Tediously
I cut a squarish 12" deep plug and lift it carefully out and break the
soil away from the roots with utmost care to minimize tearing or breaking
the plump brittle roots. The broken roots are a mixed blessing; each little
piece may grow an entire new dandelion plant; each broken end on the harvested
portion will exude some of the precious hepatophilic latex. I try to dig dandelions
on cool doudy days to reduce heat and drying damage. If not entirely possible,
I take an extra sheet or two along for impromptu shade/cover for plants already
harvested. So far, whole dandelion plant harvest has been exclusively for
the fresh plant extract medicinal trade. Since they are to be shipped fresh
live, great care is taken to ensure that freshness. Not only do I dig on cool
cloudy days, but also early in the morning to reduce plant stress. The plants
are pressure washed with pure, unchlorinated water in the shade and allowed
to drain before packing and shipping.
Dandelion Tops and Roots Separately
Dandelion Tops Dandelion tops are best harvested by briskly cutting the entire aerial plant off, about 1/2" down onto the crown of the root with a good sturdy ground knife or wide-mouthed anvil pruners, shaking off any dirt, plucking out all of the dead or damaged leaves and spent floral stems, and quickly hanging each individual plant up to dry at 80-90°F until crispy dry. These whole plants are good food and medicine.
Dandelion Roots If I am digging dandelion roots during the active growing season, I will have some greens for every root harvested; these are set aside and treated as above. Dandelion roots dug in the autumn have different though also many of the same medicinal properties, than dandelion roots dug in the spring. Late spring and summer roots can be rather puny and shriveled. I prefer plump sweet roots dug in the autumn and early winter. Scorpio and Pisces are the favorite time frames for me. I like digging on a cool cloudy or lightly raining day so the soil does not dry onto the roots while waiting to be washed away. Most dandelions grow in full sun and suitable shade may be quite distal. Before drying, the roots are pressure-washed with pure water coarsely in a pile and then finely individually by hand and allowed to drain for up to an hour on screens. Roots thicker than an inch in diameter are cut in half longitudinally before being placed on the drying racks. Otherwise, dandelion roots are dried whole without cutting at 80-100oF inside until crispy hard-crack dry, and then placed in airtight, opaque containers.
It has been my curious observation that large roots can usually be selected in the dormant season by observing the extent of leaf margin dentition: the more deeply notched the leaf margins and the more pointed the small dormant leaves' tips, the larger the roots. Dig on. Any rapid or unexplained decline in dandelion populations should be viewed with utmost alarm.
PLANTAIN Plantago major & P. lanceolata
Tools: Ground knife or anvil pruner 5-Gal harvest bucket.
 Plantain
leaves are very fragile once harvested even though quite tough in the ground,
withstanding repeated impact trauma and related physical abuse. They are best
used fresh. I harvest them by cutting 1/2" below the top of the corm
so that all of the leaves remain attached to the corm; this reduces harvest
shock. The cutting is done with a ground knife or anvil pruner, this activity
dulls blades quickly. The cut plants are delicately handled and placed corms
down in 5-gallon plastic buckets. If it were over 50oF
I would put an inch or so of water in the bottoms of the collecting buckets;
the buckets are kept shady and cool. I prefer to harvest on a cool cloudy
day before 9 AM in one of the spring months. A little rain will not hurt.
Dried plantain leaves are medicinally much less effective than fresh leaves.
Cut plantain corm bases left in the ground tend to regrow successfully. Plantain
seems to be a very successful abundant wild plant. Its hardiness may assure
its further survival.
Plantain
leaves are very fragile once harvested even though quite tough in the ground,
withstanding repeated impact trauma and related physical abuse. They are best
used fresh. I harvest them by cutting 1/2" below the top of the corm
so that all of the leaves remain attached to the corm; this reduces harvest
shock. The cutting is done with a ground knife or anvil pruner, this activity
dulls blades quickly. The cut plants are delicately handled and placed corms
down in 5-gallon plastic buckets. If it were over 50oF
I would put an inch or so of water in the bottoms of the collecting buckets;
the buckets are kept shady and cool. I prefer to harvest on a cool cloudy
day before 9 AM in one of the spring months. A little rain will not hurt.
Dried plantain leaves are medicinally much less effective than fresh leaves.
Cut plantain corm bases left in the ground tend to regrow successfully. Plantain
seems to be a very successful abundant wild plant. Its hardiness may assure
its further survival.
BUTTERBUR Petasites frigidus
Tools: good leather gloves, hand grub hoe, anvil pruner, digging fork, pressure washer.
 Petasites
rhizomes are best harvested after their large palmate leaves die back in the
autumn, usually in the time of Scorpio. These lush brittle rhizomes grow 1-6"
below the soil surface in partially shaded wet areas. They are often multilayered,
complexly branched and cheerfully growing in an interwoven tangle. Individual
continuous rhizome mats can contain over 40' of linear rhizome. Rhizome location
is charted by seeking dying leaves or large prominent dormant floral buds
tipping out through the soil. I usually clear away leaves and cut out vines
and assorted vegetation present to prepare a clear harvesting patch using
a hand grub hoe to locate the rhizomes generally and then using the digging
fork at a low angle to the ground to carefully lift up big patches of rhizomes
and soil. I try to keep the rhizome complexes intact until cutting them to
20-30" lengths and placing them in buckets or transversely on a carrier
feed bag. A cool cloudy, even drizzly day is best for harvesting butterbur
rhizomes, so as to keep them wet. I pressure wash them on a strong screen,
together and then singly. The best medicine is made from fresh Petasites rhizomes.
I take care to leave some rhizomes around the entire margin of a harvest patch.
It is totally recolonized after two years.
Petasites
rhizomes are best harvested after their large palmate leaves die back in the
autumn, usually in the time of Scorpio. These lush brittle rhizomes grow 1-6"
below the soil surface in partially shaded wet areas. They are often multilayered,
complexly branched and cheerfully growing in an interwoven tangle. Individual
continuous rhizome mats can contain over 40' of linear rhizome. Rhizome location
is charted by seeking dying leaves or large prominent dormant floral buds
tipping out through the soil. I usually clear away leaves and cut out vines
and assorted vegetation present to prepare a clear harvesting patch using
a hand grub hoe to locate the rhizomes generally and then using the digging
fork at a low angle to the ground to carefully lift up big patches of rhizomes
and soil. I try to keep the rhizome complexes intact until cutting them to
20-30" lengths and placing them in buckets or transversely on a carrier
feed bag. A cool cloudy, even drizzly day is best for harvesting butterbur
rhizomes, so as to keep them wet. I pressure wash them on a strong screen,
together and then singly. The best medicine is made from fresh Petasites rhizomes.
I take care to leave some rhizomes around the entire margin of a harvest patch.
It is totally recolonized after two years.
About Ryan | Articles | Contact Ryan
©2005-2021 Ryan Drum
P O Box 25, Waldron, WA 98297-0025
Updated 04-10-2021
Website by